Hi guys!
The other day I ordered myself the Real Techniques Night Owl palette - it came today and I have spent the whole day playing around with it and thought I would write a review about it and show you two of the looks I have created. The looks are both really smoky because it is a night owl palette and so are looks that you could wear on a night out or to a fancy event! I wouldn't really say these are day time looks.
I was surprised when the palette came with a free 'pointed liner brush' and thought that this was a really nice touch. It was really convenient as well seeing as the palette comes with a gel eyeliner and I wouldn't have had a brush to apply it with!


The palette comes with four eyeshadows - a sandpaper colour with a slight shimmer called 'Quicksand', a purple with a slight shimmer called 'Royal Orchid', a dark grey/bluey colour with a slight shimmer called 'Midnight Sapphire' and a shimmery black called 'Galaxy'. Apparently one of them is matte so maybe some of the shimmer from 'Galaxy' has transferred because they all look shimmered in my palette! Here they are swatched -
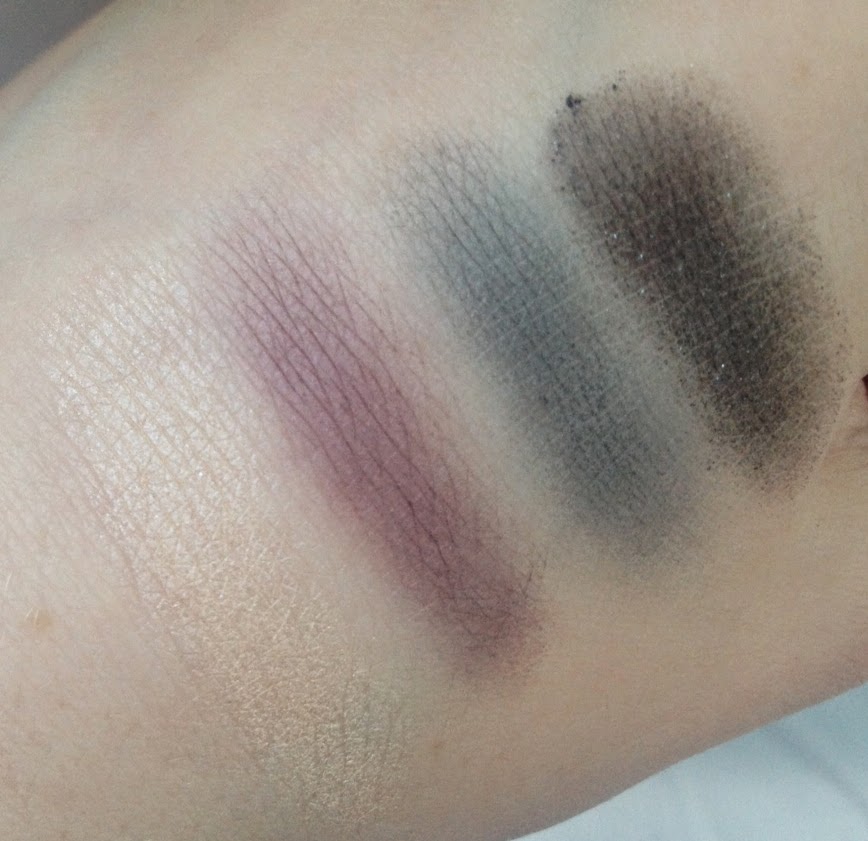
The palette also includes a black gel eyeliner, a soft glowing pink blusher, a cream highlighter, a nude lipgloss called 'Nude Rose' and a red lip gloss called 'Cabernet'.
I absolutely LOVE the gel eyeliner. I've never really been one for gel eyeliner, liquid has always been my go-to because it's so easy and fool proof to use and I think I have finally mastered the perfect flick! The brush that comes with the palette makes applying the product super easy, giving a less harsh line to your eyes than liquid liner does and making your lashes look fuller.
My other favourite from this palette is the highlighter, because like the blusher, it just really helps you get that flawless glowing cheek look. It's really lightweight and so easy to blend just with your hands.
The eyeshadows are not very heavily pigmented but what is great about them is that they are very easy to build up. The sheerest of them all is the black shimmery one and it took quite a few layers to build up quite a heavy colour pay off. They all blend together really well and are not chalky in the slightest. I love all the colours, they're perfect for a night out! When I was creating my eye looks there was quite a lot of fall down onto the face but I'm not sure if it was because of my technique or the fact I didn't use a primer to begin with.
 Here are the looks I created! I used my sister Hollie as a model. Here's a 'before' shot - she's wearing Collection Lasting Perfection concealer on any imperfections in the shade 'fair', Loreal True Match foundation in 'rose ivory' and Soap and Glory One Heck Of A Blot translucent powder.
Look 1: I used a Real Techniques Deluxe Crease Brush to sweep the sandpaper colour all across Hollie's eyelids. Next I used a Real Techniques Accent Brush to create a V shape in the outer V of her eyes with the shimmery black eyeshadow - this took a fair amount of layers! Then I took a Real Techniques Base Shadow Brush and blended from the V with the grey eyeshadow. It's really important to blend well in this step so that the shimmery black doesn't look too harsh. Then I took the eyeliner brush that came with the palette and the gel eyeliner to line her upper lash line, adding a flick in the outer corner. Then, I highlighted her inner corner with the sandpaper colour. To finish off the eyes I added Maybelline The Falsies mascara. Next, I applied the blush to the apples of Hollie's cheeks, and used the highlighter to highlight her cheekbones, and used a sparing amount to highlight her brow bone. I used Bourjois Chocolate Bronzer to slightly contour and warm up her face a little bit more then finished with the red lipgloss in the palette. Here's the result!


Look 2: I kept the face make up and mascara from the previous look but removed the red lipgloss and all eyeshadow and eyeliner. Firstly, I packed on the purple eyeshadow using the eyeshadow brush that comes with the Urban Decay NAKED palette. I then took the black shimmery eyeshadow on another clean Real Techniques Base Shadow brush and blended all across the outer part of Hollie's eyelid. I used some of her translucent powder to help blend out any harsh lines. Again, I used the sandpaper colour to highlight her inner corner and also used this as a brow bone highlight. I added some purple eyeliner from Rimmel Scandaleyes on her waterline to make the look even smokier. I also lined her upper lash line the same way as in look 1. I finished with the nude lipgloss that comes with the palette! Here's the result!


There doesn't seem to be a difference in lip colours in the pictures but Hollie has naturally quite pigmented lips.
I really hope you love the looks and please let me know if you decide to recreate them, and don't forget to let me know what you think of this brilliant palette! <3
Zoe x


